Hi friends! It's been a while, huh? My last blog post was over four months ago in January. That was right before I started working in Walt Disney World...
Hold up. Did I just say Disney World? Oh yeah, I did! Sorry about that, I still can't really believe it happened!
You see, I applied for the Disney College Program last fall. I was accepted. I took a semester off school to go have the adventure of working at the Walt Disney World Resort in Orlando, Florida! What an adventure it was.
Going into it, I had no idea what role I would play in the grand show that is Disney World. Would I like my job? Would I be required to wear an embarrassing costume? The only thing I knew for sure was that I would be working main entrance operations. I prayed that I wouldn't be stuck driving a parking tram or working the entrance to a water park. I mean, those things are fine and good (driving a parking tram might actually be pretty fun!), but it wouldn't be the same as working in one of the parks.
It was with great, great delight that I learned on the day I checked in to the apartment complex that I would be working main entrance operations at the Magic Kingdom! As things progressed and I completed Traditions and several rounds of training, I discovered my specific roles were Park Greeter and PAC (Parade Audience Control). I also decided, after talking with many people in many different roles, that Magic Kingdom Park Greeter is arguably one of the best roles offered to Disney College Program participants.
In the Park Greeter role I was generally stationed at a turnstile at the main entrance to the Magic Kingdom. I had a vague idea of what a turnstile was before I started, but just in case you don't know, here's what it looks like:
 |
You know, those clunky silver things, where you put your
ticket in the slot, put your finger on the scanner, and then
walk through the spinning arm. That's a turnstile! |
Disney is also trying to do away with the turnstiles in favor of a more open, family friendly approach to park entry. They've started transforming the park entry points to these "touchpoints":
 |
Sorry it's all noisy - iPhone camera at night, what would you
expect? I just walked up to take a picture of the touchpoints
as I was leaving the park one night, and seeing as I knew
everyone who was working that night, they decided to make
my picture a little more fun! |
These touchpoints are pretty cool, and make it a lot easier for families (especially families with strollers or wheelchairs) to come into the park. I frequently worked these in addition to the turnstiles.
There were various other tasks that I performed, especially during a closing shift (they say your CP status, which means College Program, actually stand for "Closing Person", since CPs get lots of closing shifts). Cleaning the turnstiles, putting the covers on, taking out the dirty towels that were used during the day, cleaning the break room. Can you tell I closed a lot? 1am, 2am, even 4am were pretty normal times to get off work.
The best and most coveted task for Park Greeters is stocking maps in the two tunnels that lead to Main Street, USA. This task involves walking backstage and wheeling out a cart filled with maps. You go to the map racks and make sure they're all filled 3/4 of the way full. If you fill them all the way, when someone grabs a map a whole stack will fall out since they're all squished together. It always was a competition to see who would get the maps task. How I loved seeing maps pop up when getting a new task!
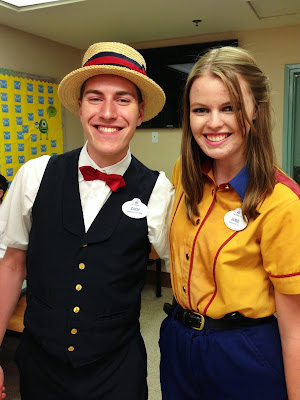
Here's a photo of me in my Park Greeter costume:
 |
I'm the one on the far right!
These are some of my fellow CPs who frequently closed with me.
From the left: Sarah, Matt, Nichole, Lauren, and I.
You guys are the best! |
My other role was PAC. I was trained on PAC in early February, and I was scheduled four PAC shifts right after training. After those four shifts, I wasn't scheduled another PAC shift until my very last week of the program, in May! I think I was more of a Park Greeter person anyway - but an even mix of the two would have been nice!
PAC is interesting because for each shift you are put in a different position. There are positions all the way down the parade route, so there are many, many positions. PAC shifts are either PAC South, meaning Main Street all the way up to the Liberty Square bridge, or PAC West, which is Liberty Square to Frontierland.
The first thing you do on a PAC shift is attend the short pre-parade meeting, usually held two hours before the parade you'll be working. You will be assigned your position for the parade and given any additional info you may need (i.e. whether there are any bands/cheerleader groups preceding the parade, things to look out for, etc.). Then you grab the cart with the stanchions and ropes for your position and wheel it out to the proper location. Once you set them up properly, you wait for the parade. At about five minutes before the parade starts, the PAC team begins clearing the street, ensuring guests are on the sidewalk and no one is standing in front of trashcans, no video camera lights are on, and all guests are behind the appropriate rope and tape lines. During the parade you continue to monitor guests, watching especially for "runners", people who would risk their lives to cross the street or grab a piece of confetti in front of the parade floats. "Risking their lives" may sound like an overstatement, but it really isn't. Would you cross a busy street in front of a gigantic, heavy vehicle driven by someone with limited visibility, even if it was slow-moving? Don't do it! This has been a public safety announcement brought to you by the Walt Disney World PAC team :-)
But that brings up a good point - PAC is all about guest safety. Unfortunately some guests don't appreciate that. PAC cast members experience a lot of not-so-nice guest interactions from people who don't want to stand in the tape lines, don't want to obey the rules put in place for their safety. That's when you get help from another PAC cast member or a coordinator - and that's also when you bond with your co-workers, backing each other up and working as a team. That's one of the great things about PAC - you really feel like a part of a team, part of a family.
The PAC costume was my favorite - it's so dapper!
 |
| Me and my good friend "Japanois" Jamie. |
On the West side the ropes are rolled out and in on rolls that people wear:
 |
| Felicia! Thanks for all your help and reassurance when I rolled! |
I had the position of roller for the first time on my last day of work! I was so thankful to work alongside of experienced PAC cast members who helped me so much during that last day.
On my days off I would visit the parks with some of the great friends I made! It was always a blast. Some of our exploits included riding Kali River Rapids four times in a row and getting drenched, visiting each of the four parks in one day, a Big Thunder Mountain Railroad marathon (once during Wishes!), visiting Chef Mickey's and laughing our heads off when we took a "family" photo, visiting "The Bench" late one night just to say we did it. So many good memories! Here is some picture evidence:
 |
| Arggh, pirates we be! Me, Anthony, and Dallin. You two rock! |
 |
We smile even when we are being blown away in a balloon! Angela, Patrick, Robert,
Dallin, Franny, me, Kevin, and Erika. Thanks for such a fun time, y'all! |
 |
| The Bench. Erika, Robert, Tori, Dallin, Patrick, and me. We did it! |
Sometimes all my friends would be working, however, and I'd visit the parks alone. I enjoyed this too, but for a different reason. I learned that I photograph things best when I am alone and there is no one to keep up with. Then I have the freedom to really look, experiment with different angles, and draw out the most beauty from a scene. I got some photos that I am very pleased with, especially since I shot exclusively with my iPhone camera! Take a look:
 |
| The facade of the American Adventure pavilion in Epcot. |
 |
| Expedition Everest in Animal Kingdom at sunrise. |
 |
| Another shot of Expedition Everest. |
 |
| Dancers in the Frontierland Hoedown in the Magic Kingdom. |
 |
| The lobby to the Hollywood Tower Hotel in the queue to the Tower of Terror. |
 |
| And of course Cinderella Castle in the Magic Kingdom. |
I'm thinking about making a sort of coffee table art photo book to sell with some of the photographs from my time in WDW. We'll see how that goes.
There's one more story I must share. I know this post is running long, but this is a good one:
Almost every day I would take a trip to Magic Kingdom's costuming building to pick up a new costume and return my soiled one. Each time I would pick up the same yellow shirt and blue pants, but I would pass by the rows and rows of other costumes. My favorite attraction in all of Walt Disney World is the Haunted Mansion. That may come as a surprise, but my aesthetic inclinations often lean toward vintage, shabby, distressed styles, so it really is a no-brainer. If I could choose, I would definitely work at the Haunted Mansion. So one day, as I passed a row of Haunted Mansion butler costumes, I wondered "Would it be possible for me to check one of those out, just to try on?" Once I had gathered my courage, I picked out a piece of the costume and brought it through the costume check-out system, anticipating an alarm to go off saying I wasn't authorized to check out the costume. No such alarm rang! The next day I acquired the rest of the costume, and later tried it all on. I actually wore it to the class that I was taking through Disney, since we were allowed to wear our costumes to class. After class I had my roommate take a few pictures. Here's how the best one turned out:
 |
| I'm a geek, I know. Dreams really do come true at Disney! |
I returned the costume shortly thereafter, of course. Oh how I would love to have taken it home!
I hope you've gathered from my description of the time I spent as a cast member that it was a phenomenal experience. Any negative happenings were outweighed many times by good ones. I could see God's hand at work in so many things: the roommates I stayed with, the friends He provided, the work, how everything worked out for my family to visit several times, everything! I'm glad to be home, but I can't lie: I am already thinking about doing another college program, along with some of my new friends!
So there you go. My grand adventure. I plan to get back to more regular blogging here soon. Thanks for reading, folks!


.jpg)


